Hi Joe,
I sincerely appreciate the offer but I've already ordered two kits from DesmoPro, one for the Mach 1 and one for the generic 250.
The repair kit is described as "a bridge and a coil spring."
I plan to document this a little bit on the website.
Jim
Kick-start slip on narrow case
Moderator: ajleone
-
DanM
- Posts: 88
- Joined: Wed Mar 07, 2012 7:30 pm
- Location: Houston, Texas
Re: Kick-start slip on narrow case
Did Ducati ever make a retro kit to put the 1966 type coil spring in the pre 1966 n-c's?
-
DewCatTea-Bob
- Posts: 2897
- Joined: Sun Nov 01, 2009 10:53 am
- Location: Near SE side of Lake Michigan
Re: Kick-start slip on narrow case
____ Yes, either Ducati produced such a kit or Berliner simply offered all the updated replacement parts needed for the modification.DanM wrote:Did Ducati ever make a retro kit to put the 1966 type coil spring in the pre 1966 n-c's?
I-myself never ordered the kit, as I always found other alternatives for the fix, and the set of parts was too expensive to get merely find-out exactly what it-all actually consisted of.
__ It will be interesting to see what the spring-retainer/bracket (that Jim gets) looks like, (cuz I wouldn't wish to simply employ the standard 1966-type bracket with it only held in place with just the lower bolt).
Hopeful-Cheers,
-Bob
PLEASE NOTE... If this-post is not-yet signed-off with '-Bob', then I'm still in the process of completing it,, and if not also included with 'DCT' near bottom as well, then I may edit this post's wording at a later time. - Dct.Bob
-
Octane
- Posts: 121
- Joined: Fri May 20, 2011 1:36 pm
Re: Kick-start slip on narrow case
I hate to be captain obvious, but having too much tension on the clutch cable can also cause the kick start to slip. Caught me out one 
-
DanM
- Posts: 88
- Joined: Wed Mar 07, 2012 7:30 pm
- Location: Houston, Texas
Re: Kick-start slip on narrow case
DCT-Bob wrote:__ It will be interesting to see what the spring-retainer/bracket (that Jim gets) looks like, (cuz I wouldn't wish to simply employ the standard 1966-type bracket with it only held in place with just the lower bolt).
I bought a '66 n-c coil spring and hold down bracket on eBay in case it's ever needed for my '65. The spring is pretty strong. I don't see how one bolt could hold the bracket in place and keep it square on the gear.
Jim, please post a picture of you kit when you get it.
Thanks,
Dan
-
JimF
- Site Admin
- Posts: 1141
- Joined: Fri Oct 23, 2009 2:49 am
Re: Kick-start slip on narrow case
I secured a repair kit, actually two repair kits from Desmo Pro as I have two 250s in need.
It turns out that the 4-speed and 5-speed kits are different in that the shoulder screw and spacer (chamfered at one end on one side) are longer for a 4-speed than a 5-speed.
I have two 5-speed bikes, but I can shorten the 4-speed kit.
More to follow as the installation takes place.
It turns out that the 4-speed and 5-speed kits are different in that the shoulder screw and spacer (chamfered at one end on one side) are longer for a 4-speed than a 5-speed.
I have two 5-speed bikes, but I can shorten the 4-speed kit.
More to follow as the installation takes place.
You do not have the required permissions to view the files attached to this post.
-
Eldert
- Posts: 829
- Joined: Sun Nov 01, 2009 3:23 pm
- Location: Hazerswoude Rijndijk Netherlands
Re: Kick-start slip on narrow case
DanM wrote:I bought a '66 n-c coil spring and hold down bracket on eBay in case it's ever needed for my '65. The spring is pretty strong. I don't see how one bolt could hold the bracket in place and keep it square on the gear.
Jim, please post a picture of you kit when you get it.
Thanks,
Dan
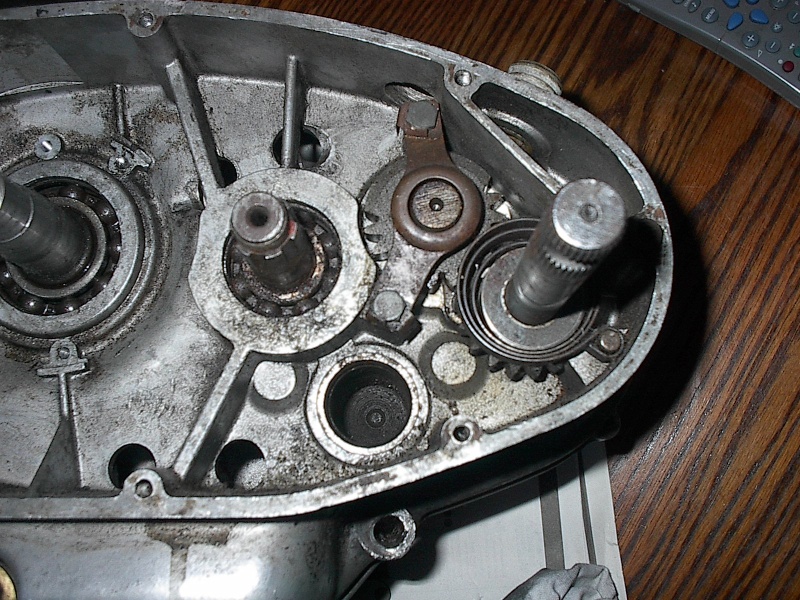
the bridge is held down by 2 bolts like this
when converting from leaf to coil spring with one of Desmopro s kits the short spacer goes under the bottom bolt
the longer spacer goes under the top bolt . i think you have to drill and tap a M6 thread for the top bolt
Eldert
-
JimF
- Site Admin
- Posts: 1141
- Joined: Fri Oct 23, 2009 2:49 am
Re: Kick-start slip on narrow case
Help me!
I tried like heck to locate the hole correctly and somehow I came up a little off.
I figure:
A) I could enlarge the big hole, but the coil spring could pop out.
B) I could slot the top hole in the bracket and tweak the bracket's position. I then figure I might jam something into the side slop to keep the bracket from walking back.
C) I could leave everything the way it is.
I need advice!
Thanks.
Jim
You do not have the required permissions to view the files attached to this post.
-
DewCatTea-Bob
- Posts: 2897
- Joined: Sun Nov 01, 2009 10:53 am
- Location: Near SE side of Lake Michigan
Re: Kick-start slip on narrow case
" I tried like heck to locate the hole correctly and somehow I came up a little off. "
____ Damm!, I had meant to warn you about this very exact same thing !
(I hope you didn't teach yourself this lesson on your Mach-I.)
__ This is the time of year when I'm either outside or sleeping, as I must get all the things done outside (that I've been putting-off all season), before it becomes too cold outside for me to do.
So lately these-days, I don't have much time to sit-down and respond to all the posts which I'd otherwise respond to in a more timely-manor.
____ I had been thinking of what wording I'd use to instruct you on how to best locate the hole in your first job-attempt (which ought to have been done in your Mk-III motor). _ But it was too extensive & complex to quickly explain well with written-word, and-so I just hadn't gotten-back to finally doing it... (darn-it!).
Oh-well,, I now suggest that you try doing your plan-B, (as others have also had to end-up doing). ...
" B) I could slot the top hole in the bracket and tweak the bracket's position. I then figure I might jam something into the side slop to keep the bracket from walking back. "
____ Now that you've LEARNED what's what with this particular job, you can carefully measure precisely how far-off you were with your (first)- created hole, and-thus exactly compensate before actually drilling your NEXT -(second-try) hole-job.
__ For others who have to learn for themselves exactly where to drill the hole (for their first-time), I once took a piece of 1/4-20 threaded-rod and held it to the spring-plate's upper-hole with a couple of nuts, then with that plate bolted-down to the lower case-boss, I centered the plate's shaft-hole around the shaft (and kept it held that way with a bottle-cap over the shaft-tip & into the plate's shaft-hole), and then adjusted the threaded-rod until it came into contact with the area of the case where the intended hole should be drilled at, then sprayed a slight-touch of black-paint at that end of the rod. _ Then with everything taken back-off & out of the way, it was of-course then quite obvious as to exactly where the hole needed to be drilled at !
Another time, instead of the spray-paint idea, I put a small dab of white-grease on the tip-end of the threaded-rod and adjusted it downward (rather slowly) until the grease got deposited on the case-wall exactly where expected. _ I also had then made use of a jig-block I had made to make-sure that the hole would be drilled at an EXACT right-angle to the case-wall (so that the mount-screw would then screw-in perfectly straight inward).
__ As I recall, I believe a 3/16ths" drill-bit was a suitable size, for threading (the newly-made case-hole) with a 6x1mm threaded-tap,, HOWEVER, I'd always 'start' the hole with a smaller drill-bit (like a 1/8th"), so as to be sure that the hole was going to end-up centered exactly where intended, (and IF that smaller hole somehow turned-out to be off-center at-all [due to 'bit-wondering'], then I could next compensate when going-through with a larger drill-bit).
__ And BTW, when I once had to fix another's botched-attempt (at drilling & tapping that hole), it worked-out okay to drill the hole slightly larger (13/16ths", but more towards the right, to help compensate for having been off-center), and re-tap the hole with 1/4-20 thread (for a 1/4-20 bolt).
Hopeful-Cheers,
-Bob
PLEASE NOTE... If this-post is not-yet signed-off with '-Bob', then I'm still in the process of completing it,, and if not also included with 'DCT' near bottom as well, then I may edit this post's wording at a later time. - Dct.Bob
-
JimF
- Site Admin
- Posts: 1141
- Joined: Fri Oct 23, 2009 2:49 am
Re: Kick-start slip on narrow case
Well, I went to bed last night disappointed in my screw-up.
I had assembled the bridge sans spring and secured it into the bottom hole. For the top hole I set the spacer behind the upper bridge hole and ran a drill bit just a little smaller than the spacer's inside diameter through the bridge hole and the spacer. When I had the large opening in the bridge where I wanted it, I twisted the drill to make a mark in the case.
How could I have screwed it up? How could I have done better it any differently?
This morning I went out to drill a new hole.
I measured the distance I needed to move the large center hole of the bridge and came up with 0.120" (3 mm.)
I knew I didn't have enough room to drill another M6 hole that close to the original hole.
I took out the bolt and spacer and eye'd it up through the hole in the bridge - it looked spot-on!
Then I ran the bolt through the bridge with no spacer - Perfect alignment!
I think the small amount of chamfer on the spacer at the engine case resting against the boss on the surface was dramatacially changing the geometry at the bridge end of the spacer. I increased the chamfer using my bench grinder, and the whole thing re-assembeled perfectly!
Jim
You do not have the required permissions to view the files attached to this post.
Return to “Ducati Singles Main Discussions (& How to Join)”
Who is online
Users browsing this forum: No registered users and 64 guests